Friday, April 25, 2014

Greens and Garbanzos

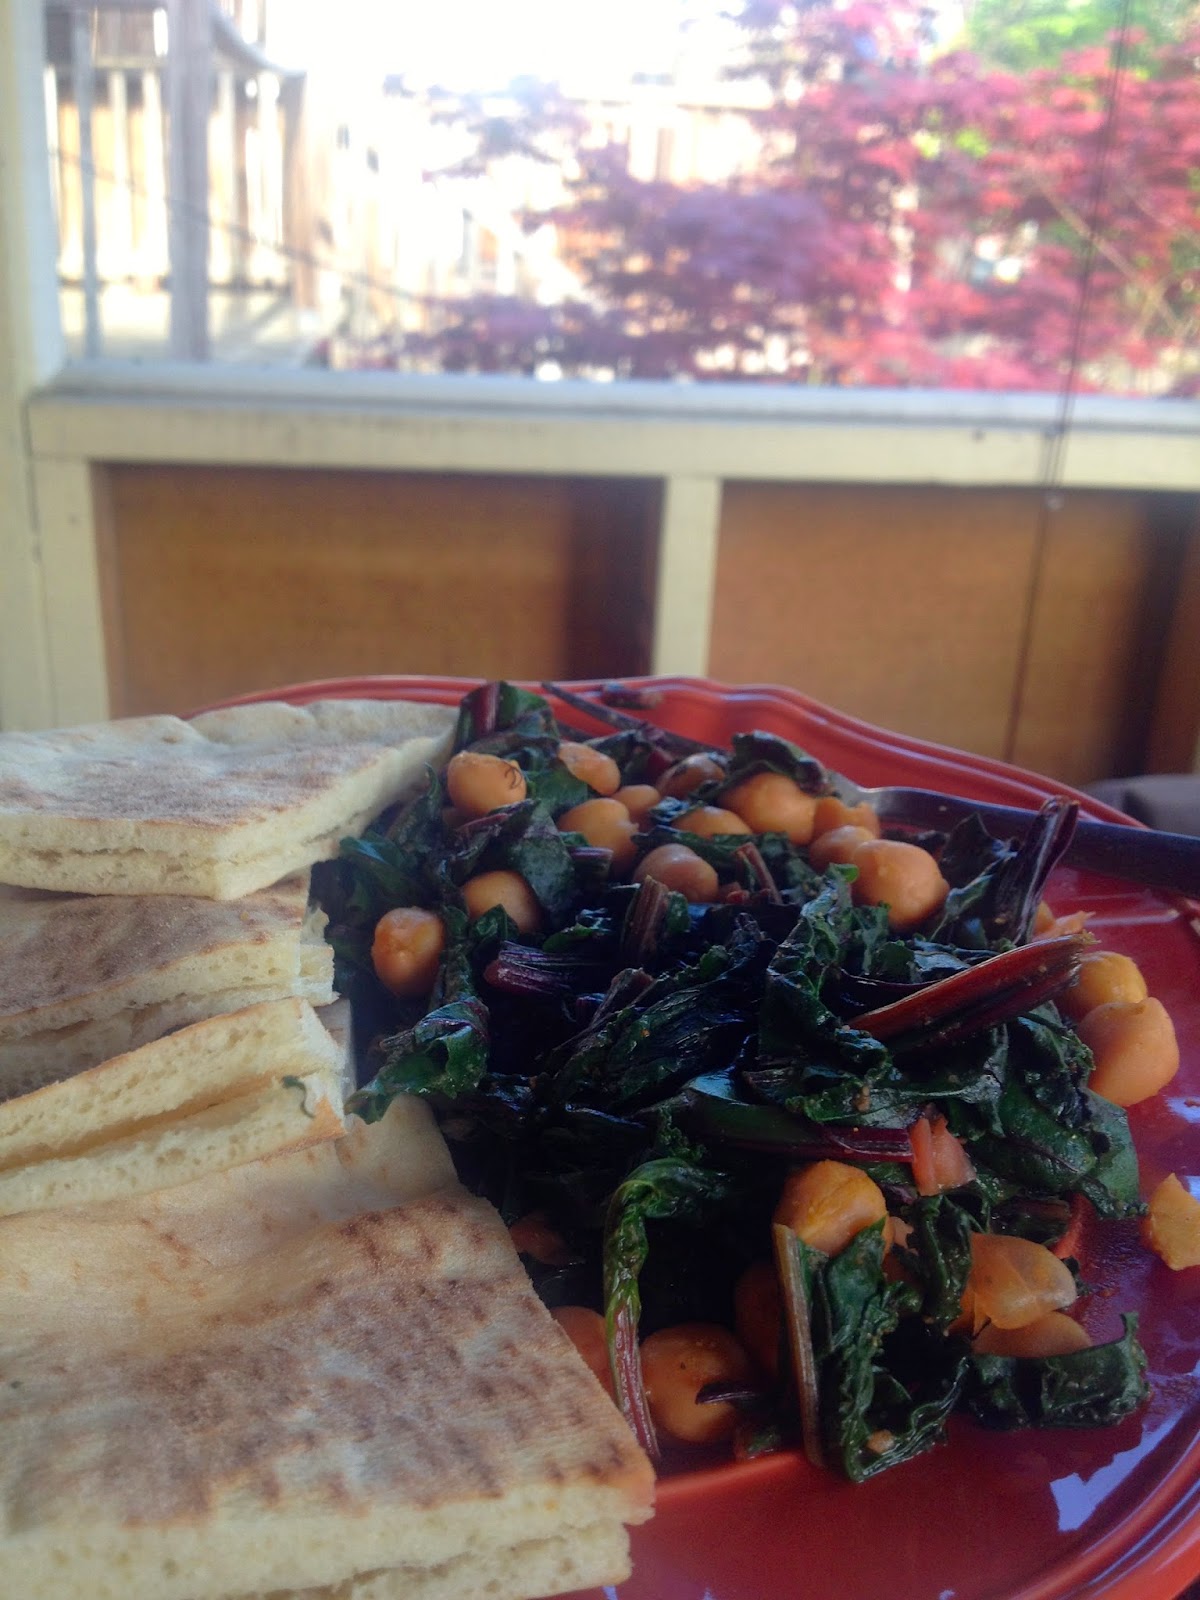
I've waxed poetic about how incredible beets are before, but did you know that you can totally nom on the leafy tops, too? I recently found out that they are not only edible but delicious, and have subsequently had recurring nightmares about the ghosts of all the poor beet greens I've tossed in the past. With farmer's markets popping up like tourists in the spring, you're bound the end up with a huge pile of leafy greens that you have no idea what to do with. Allow me to offer a solution: Beet Greens and Garbanzo Beans.


This dish is my go-to dinner when I'm too busy/lazy to put together a more complicated meal. It literally takes 15 minutes start to finish, including prep and clean-up, and is packed with protein, fiber, and Vitamin A. You can use chard or spinach in place of beet greens if you prefer, and of course you can mix and match the spices in this little sitr fry to get completely different flavors. 

A few notes on beet greens! Once you get your bounty home, cut the greens off the actual root - otherwise the leaves will suck the moisture out of the beets, which will make the beets tough and less sweet. You can store the greens in the fridge for a couple of days, but try to use them soon for maximum crunchy freshness. If they do end up looking a little wilty, just toss them into big bowl of ice water for 10 minutes before you prepare them - they'll perk right up! 


Beet Greens and Garbanzo Beans
Serves 4

4 cups of beet greens, de-stemmed and roughly chopped (this sounds like a lot, but I promise it's just a medium-sized bunch!)
1 can garbanzo beans, drained
1 tablespoon lemon juice
2 teaspoons garlic powder
2 teaspoons cumin
salt and pepper to taste
olive oil to coat your pan

Grab a big saucepan and heat the oil over medium heat, then throw in your greens. It's okay if they're still a little wet from when you washed them - this will actually help prevent them from burning. Stir this giant pile of foliage around for about 2 minutes, until the greens have cooked down a little bit but still look bright and crunchy. 

Look at that leafy goodness. 

Throw your garbanzo beans into the pot and add the lemon juice, garlic powder, cumin, salt, and pepper, then cook for another 2-3 minutes. Feel free to get crazy at this point if you want - substitute the lemon juice and cumin for soy sauce and powdered ginger for an Asian-inspired meal, or liberally add dried chili flakes and/or Sriracha for a bit of a kick. 

Still gigantic, but wilting down!

Your dish is done when the garbanzo beans are heated through, but you can continue cooking for another couple of minute if you like your chickpeas a little softer. Serve with rice, couscous, or pita bread, and enjoy, preferably with sunshine and fresh air!


Friday, April 18, 2014

April Showers Bring...Chai Tea Ice Cream

This past January, I moved into a new house in a great neighborhood with awesome people. As the weather slowwwwly but surely gets better, we've been getting to enjoy one of the best features of this lovely place: an enclosed porch, complete with a grill, comfy patio furniture, and a view over the community dog park behind our house. All I want to do is sit out there and bask in the glory of spring, preferably while eating delicious warm weather treats, like the Chai Latte Ice Cream that I'm going to share with you lucky devils today.


Ice cream was one of those things I thought I'd miss as a vegan, but then I discovered coconut milk ice cream and I've never looked back. This recipe combines the fragrance of chai tea and five different spices with the smooth goodness of coconut milk and cashew cream, and the result is heavenly. Even the girlfriend - one of those mythical creatures who can eat a single Thin Mint and be satisfied - gave this the stamp of approval, so I'm going to go ahead and call it a success.

I very seriously considered buying an ice cream maker for the sole purpose of never running out of frozen treats this summer, but ultimately decided to hold off on adding a super specialized gadget to my kitchen for now. Luckily, I found instructions for several different ways to make ice cream without this contraption! If you do have an ice cream maker, crank that bad boy up and let it do its thing. If not, check out the recipe below for details on how to get by without one - all you need is a giant bowl and some serious forearm strength!


Chai Latte Ice Cream
recipe adapted from the brilliant folks at The Minimalist Baker; machine-free instructions are from David Lebovitz

Makes about 2 pints of ice cream.

1½ cups raw cashews
1 cup coconut milk
3 bags of chai tea
¼ cup coconut oil, melted
¼ cup maple syrup
¼ cup sugar
1 teaspoon vanilla
1 teaspoon each of cinnamon and ginger
½ teaspoon each of ground cloves, allspice, and cardamom

You'll need a little prep time for this recipe; I recommend starting it the evening before you want to serve your ice cream. Start off by soaking your cashews. Just dump them in a bowl, pour in enough cold water so that they're all submerged, and leave them alone for at least 6 hours (overnight is fine, too). Now steep your tea in a mug of hot water for about 3 minutes - it's going to be ridiculously strong! - and leave it in the fridge until you're ready to use it. Finally, grab your largest bowl and put it in the freezer to chill. This will help your ice cream set once you pour it in.

Chai tea and cashew cream. And DIY coasters!

When you're ready to actually whip up your frosty dessert, you'll start by making cashew cream. Throw your soaked cashews (they'll be a little soft and kind of bland) into a food processor or blender, and puree them forever and ever. You should end up with something that looks a little bit like very thick, very pale peanut butter.

Add the coconut milk, coconut oil, brewed tea, maple syrup, sugar, vanilla, and spices to the blender and whirl everything around for at least 3 minutes, stopping every once in a while to scrape down the sides. Your "ice cream" is going to look a little gross at this point - picture a partially melted Frappucino and you'll have a good idea of what you're working with.

Starring: cinnamon.

When you're certain that every little clump of cashew has been demolished, pour the liquid into your pre-chilled bowl and stick it in the freezer. Now comes the hard part: waiting and mixing. Every 45 minutes or so, take your bowl out and whisk the mixture really vigorously for about 2 minutes, then put it back in the freezer while you go watch another episode of The Wire. At first, it'll still be pretty watery; the next time around, though, it'll have a pudding-like consistency, and after about 3 hours you'll be breaking a sweat trying to mix it properly.

Once your ice cream is sufficiently solid, transfer it into a tupperware container and let it sit in the freezer until you're ready to eat it. Or just, ya know...eat it. Add chocolate chips, because life is short. You can also try running your ice cream through the blender one more time before you serve it - this will get you a soft serve texture if that's more your cup of (chai) tea!


Friday, April 11, 2014

You Saucy Minx

It's sunny and the cherry blossoms are blooming and the tourists are swarming down on DC...it must be spring!! After a vicious winter that made me question my sanity for ever having left California, I'm so thrilled to have warmth and long daylight hours in my life again. The changing seasons also mean that it's time for lighter, greener meals...starting with today's deliciously bright Avocado Pesto.


Pesto is traditionally made with basil, Parmesan cheese, pine nuts, and olive oil. It is also traditionally amazing on pretty much any kind of carby base. I made a few adjustments to veganize and economize (did you know that pine nuts are apparently made of solid gold, judging by how expensive they are?), and added cilantro and lime to make the sauce a little lighter and more spring-like. Although apparently some people are allergic to cilantro and it leaves a really terrible, soap taste in their mouths? I feel so sorry for you, friends. If you can't stand this little herb, feel free to leave it out - just add another handful of basil in its place!

I won't lie, this pesto is not a low-calorie food in any way - avocados and almonds both contain heaping helpings of unsaturated fat. But! This kind of fat is way better for your heart and joints than the saturated fat found in olive oil and cheese, and I promise you don't have to sacrifice any of the rich, creamy flavor of regular pesto.


Avocado Pesto
Makes about 1 cup of pesto

3 cups basil
½ cup cilantro
¼ cup almonds (roasted or raw, it doesn't matter!)
3 cloves garlic
½ avocado
1 tablespoon nutritional yeast
1 tablespoon lemon juice
¼ cup water
salt and pepper, to taste

Roughly chopp the basil, cilantro, almonds, and garlic and toss them all in a blender or food processor. Remove the pit from your avocado, slice it into little cubes, and throw it to your leafy pile. Finally, add the nutritional yeast, lemon juice, and water.

The goods.

Whirl everything around in the blender for 2-3 minutes - you'll probably have to stop to scrape down the sides a couple of times. Once your pesto is starting to look smooth and creamy, stop to do a taste test and add as much salt and pepper as you fancy. You may also want to add more lemon juice or water if the sauce seems unreasonably thick.

All blended up.

You can store the finished product in the fridge for up to a week, or seal it up in a jar and freeze until you're ready to bust out some pesto magic for pasta, pizza, roasted veggies, burgers...the possibilities are endless!


Friday, April 4, 2014

Tahini Bikini

Don't worry, this post doesn't include any weird "food as body paint" situations. What it does include, though, is a recipe for unbelievably delicious cookies that I may or may not have made three times in the past two weeks: Chocolate Chip Tahini Cookies.


I love tahini (a paste made of ground sesame seeds) and have used it in various savory dishes, but had never thought to put it sweets until I came across this recipe on Hell Yeah It's Vegan. It was a rainy afternoon and I figured I would experiment a bit with my own concoction, particularly as I wanted to send some treats out to my family. Well...the second I took a bite of one of the warm cookies, I knew there was no way that batch was leaving my kitchen. The next morning I bundled myself up, trekked out for another jar of tahini, and made another couple dozen cookies, some of which did actually make it to California.

The tahini flavor is super intense in the raw dough (which I personally really loved), but it really mellows out when you bake the cookies. The end result is a nutty and rich but not overly sweet, especially if you use dark chocolate. And just think how damn classy you're gonna feel when you bring fancy tahini cookies to your next office party! No one needs to know how simple they really are - it'll be our little secret.


Chocolate Chip Tahini Cookies

Makes 2 dozen cookies

½ cup granulated sugar
½ cup light brown sugar
⅔ cup tahini
¼ cup Earth Balance
¼ cup soy milk (or any other non-dairy milk)
½ teaspoon vanilla
1 ½ cup all-purpose flour
1 teaspoon baking soda
½ teaspoon salt
1 cup chocolate chips (I used dark chocolate, but you do you!)

Preheat your oven to 375 F and lined a couple baking sheets with aluminum foil. In a large bowl, mix together the sugars, tahini, and Earth Balance until you have a really smooth, thick batter. Add the soy milk and vanilla and mix again for another minute or so.

Super smooth.

In a separate bowl, stir together the flour, baking soda, and salt, then dump that into the batter and mix until everything is nicely blended together. Add your chocolate chips and stir one last time. You could also shredded coconut or chopped walnuts here if you'd like - just stir them in along with the chocolate!

Chocolate chips are mandatory, though.

Grab an ice cream scoop or a big spoons or your two hands and make little dough balls - mine were about the size of a golf ball, but you could make giant cookies if you prefer. Just be sure to flatten them out a bit once you put them on the baking sheet, because they're not going to spread too much by themselves.

Seriously just pop one of these in your mouth. You won't regret it. 

Pop those suckers in the oven and bake for 12 minutes, until they start to turn golden brown. Once you take your cookies out of the oven, let them sit for a couple of minutes before taste testing, because they're going to be a little gooey while they're still hot. Warning: the smell of these baking is going to brings all the bois to the yard, so brace yourself!